Managing Event Speakers
How to add and manage speakers for your event, including the lifecycle pipeline, travel logistics, and deliverables tracking.
Speakers bring your event to life. Event Vault gives you a complete speaker workspace: a rich public directory with detailed profiles, social links, and session assignments visible to attendees in the companion app, plus internal tools to track every speaker from first invitation through to the day of the event.
Accessing the Speakers Section
- Log in to the Management Console.
- Select your event, then choose Speakers from the navigation menu.
The Speaker Workspace: Three Views
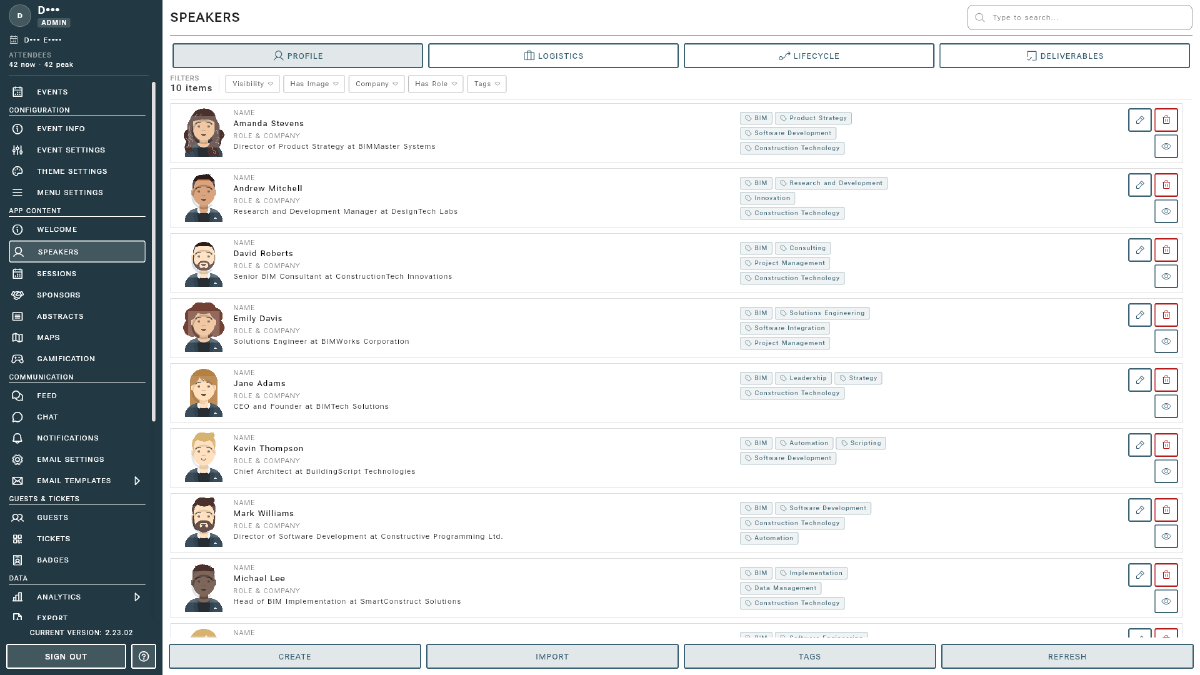
The Speakers page is organised into three tabs that all work from the same speaker list. Switch between them using the buttons at the top of the page; your search box and filters apply to whichever tab is active.
- Profile — The public-facing details attendees see: name, role, company, biography, image and tags — plus, for your team, each speaker’s pipeline stage from Invited through to Attended, an internal note, and the visibility toggle the stage drives.
- Logistics — Internal travel and hospitality planning for each speaker: visa and travel documents, flights, transfers, hotel, dietary and accessibility needs, fees, and key contacts.
- Deliverables — A content-readiness checklist showing at a glance who has provided a headshot, bio, slides, AV requirements, and recording consent.
Adding a New Speaker
- Click the CREATE button on the Speakers page.
- Enter the speaker’s details:
- Name: Full name of the speaker (required).
- Role/Title: The speaker’s job title or role (e.g., “CEO”, “Lead Engineer”), optional.
- Company/Affiliation: The organization the speaker represents, optional.
- Account Email: The speaker’s email address. Required for Q&A moderation, speakers use this email to log in to the companion app and moderate questions for their assigned sessions.
- Status (Invited / Confirmed): Controls whether the speaker is published. New speakers default to Invited, which keeps them hidden from the app and public website widgets while you finalise their participation. Set them to Confirmed to make them public.
- Tags: Assign one or more tags from your event’s speaker tag list to group and filter speakers. Tags are chosen from a shared list rather than typed freehand (see Managing Speaker Tags).
- Biography: Rich text biography supporting formatting. Displayed on the speaker’s profile in the app.
- Image: Upload a profile photo. Use a high-resolution, professional headshot for best results.
- Website Override: Optionally provide a separate biography that is shown only on the public website widgets, leaving the in-app bio untouched (see Website Bio Override).
- Click Save to add the speaker to your event.
Editing or Removing Speakers
- To edit a speaker, click the Edit icon next to their name, update the details, and save.
- To remove a speaker, click the Delete icon next to their name.
Duplicate Name Check
When you save a speaker whose name matches an existing speaker (case-insensitive), the console warns you before creating a duplicate. You can choose Create Anyway / Save Anyway if the match is intentional (for example, two different people sharing a common name), or cancel to review the existing entry first.
Managing Speaker Tags
Tags let you group speakers by theme, track, or type (e.g., “Keynote”, “AI”, “Sponsor Speaker”) so you can filter the list quickly and surface groupings on public website widgets. Tags are drawn from a shared, per-event list rather than typed freehand each time, which keeps them consistent and spelling-free.
- On the Speakers page, click the TAGS button to open the speaker tag list.
- Add, rename, or remove tags to define the vocabulary available for this event.
- Click Save. These tags then appear as selectable options whenever you edit a speaker.
When editing a speaker, choose tags from the list in the Tags selector. If you type a tag that does not exist yet, it is created on the fly and automatically added to the event’s tag list so it becomes reusable for other speakers.
Speaker Lifecycle Pipeline
Every speaker card on the Profile tab carries a coloured stage pill showing where that speaker stands in your planning process, from the first invitation to their appearance on the day, and the card’s edge is tinted in the same colour so the pipeline reads at a glance down the list. Use the Stage filter as a funnel to see how many speakers are confirmed, waiting on contracts, or still to be chased.
Each speaker moves through the following stages:
- Invited — Reached out; awaiting a response. (Speakers in this stage stay hidden from the public website.)
- Confirmed — Agreed to participate.
- Contract Sent — Speaker agreement issued.
- Contract Signed — Agreement returned and countersigned.
- Materials Received — Bio, headshot, and other assets received.
- Briefed — Briefing call or run-of-show completed.
- Attended — Appeared at the event.
- Declined — Will not participate (the terminal stage; these speakers are also hidden from the public website).
Click the stage pill on a speaker’s card to move them to another stage. The Stage filter shows how many speakers sit in each stage and narrows the list to one of them so you can focus on what needs action. The note button beside Edit attaches a short internal note to a speaker (for example, “waiting on legal to review the rider”) that is shown on the card and visible only to your team.
Travel & Logistics
For events that fly speakers in, the Logistics tab captures everything your team needs to get each speaker to the stage and look after them while they are with you. Open a speaker’s logistics card to record:
- Travel Documents: Legal name (as on passport), nationality, date of birth, passport number/country/expiry, and visa status (Not Required, Pending, Approved, Letter Sent). A GDPR consent checkbox is provided before storing passport and date-of-birth data.
- Contact: Mobile number, preferred messaging app, assistant details, and an emergency contact.
- Inbound & Outbound Flights: Airline, flight number, airport/terminal, and arrival or departure date and time, plus the booking reference.
- Ground Transfers: Separate arrival and departure transfers, with transfer type, driver details, and a confirmation checkbox for each.
- Accommodation: Hotel name, address, phone, room type, check-in/check-out dates, booking reference, and billing arrangement.
- Hospitality & Care: Dietary restrictions, accessibility needs, and any plus-one guest.
- Booking & Fees: Who booked the travel, travel agency contact, honorarium (speaker fee), and per-diem arrangement.
The Logistics tab includes rich filters — by visa status, flights booked, transfers booked, hotel, dietary/accessibility needs, and plus-one — each showing live counts, so you can answer questions like “who still needs a return flight booked?” in one click.
Deliverables (Content Readiness)
The Deliverables tab is a checklist view for chasing the assets you need from each speaker before the event. For every speaker it shows whether they have provided:
- Headshot — A profile image (derived from the speaker’s profile).
- Bio — A biography (derived from the speaker’s profile).
- Slides — A presentation deck (PDF, PPT, PPTX, KEY, or ODP). You can also mark slides as received and set a due date.
- AV — Audio/visual or tech-rider requirements.
- Consent — Consent to record their session.
Each item can be filtered by “Have” or “Missing” with live counts, giving you a fast way to see who is still outstanding on any given deliverable as the event approaches.
Managing a Speaker’s Slide Deck
Open a speaker’s Deliverables editor to manage their presentation. The Slide Deck control works like the image uploader elsewhere in the console — the file is shown alongside a set of action buttons:
- Upload — Choose the presentation file to attach. Uploading a deck automatically marks the speaker’s slides as received.
- Download — Save the deck to your computer under its original file name (useful for compiling all speakers’ decks or loading them onto the venue machine).
- Replace — Swap in a new version of the deck.
- Remove — Detach the current deck from the speaker.
Website Bio Override
By default, a speaker’s biography is shown both in the companion app and on any public website widgets. If you want the website to display a different bio — for example, a more marketing-oriented version — enable Override on Website on the speaker’s Profile and enter a separate Website Bio. When the override is on, the public website widgets use this bio while the in-app profile continues to use the standard biography.
Reusing Speakers From a Previous Event
Most speakers come back. Instead of re-typing them, copy them straight from an earlier edition:
- In the Speakers section of the Management Console, click IMPORT.
- Under From a previous event, pick a Source Event.
- Click SELECT next to Speakers, search the list, and tick the people you want.
- Switch to another source event and tick more if you like — selections from every event you visit are kept and imported together.
- Click CONFIRM.
Each copy becomes a speaker of the current event: the profile (name, role, company, e-mail, biography, tags, headshot and website bio) is duplicated, and any tag that is new to this event is added to the event’s speaker tag list.
Importing Speakers in Bulk
You can quickly add or update multiple speakers at once by importing a CSV file. This is the recommended method for large events or when migrating data from another system.
- Prepare your speaker data in a CSV file using the Sample CSV as a template.
- Ensure your CSV file is formatted exactly as shown, with the first row containing the headers in the correct order. Data rows can be empty except for required fields.
- In the Speakers section of the Management Console, click IMPORT.
- Under From a CSV file, choose your CSV file, then click CONFIRM to import your speakers.
Speaker Data Format
Format of the CSV file for importing speakers.
| HEADER | ID | NAME | ROLE | COMPANY | BIOGRAPHY | IMAGE URL | |
|---|---|---|---|---|---|---|---|
| FORMAT | String | String | String | String | String | String | String (HTTPS) |
| CONTAINS | Unique ID | Speaker Name | Speaker Role | Speaker Company | Speakers Email (Provides additional authority) | A short biography | A HTTPS URL to a publicly available image |
| REQUIRED | YES | YES |