Managing Event Sessions
How to add and manage sessions for your event.
Sessions form the backbone of your event schedule. Event Vault gives you full control over session details, speaker assignments, interactive features, and schedule organization using tracks.
Accessing the Sessions Section
- Log in to the Management Console.
- Select your event, then choose Sessions from the navigation menu.
Adding a New Session
- Click the CREATE SESSION button at the bottom of the Sessions page.
- Fill in the session details:
- Name: The title of the session (required).
- Format: Session format: e.g., Workshop, Panel, Keynote, Presentation (optional).
- Capacity: Maximum number of attendees. Set to
0for unlimited. - Location: Where the session takes place. Linking to a map marker enables in-app navigation (optional).
- Start Time & Date / End Time & Date: When the session begins and ends.
- Difficulty: Intended audience level or complexity (optional).
- Handout Link: A URL to downloadable materials for this session (optional).
- Track: Assign the session to a track or category (e.g., “Marketing”, “Technical”). Tracks help attendees filter the schedule and find relevant sessions.
- Tags: Assign one or more tags from your event’s session tag list to group and filter sessions. Tags are chosen from a shared list rather than typed freehand (see Managing Session Tags).
- Speakers: Assign one or more speakers from your speaker list. Assigned speakers can moderate Q&A for the session.
- Live Q&A / Managed Q&A: Enable interactive Q&A so attendees can submit questions during the session.
- Polls: Enable live voting polls for attendee engagement.
- Pre-Registration: Require attendees to register for this session in advance. Uses ticket capacity when set.
- Schedule Blocking: Prevent attendees from booking conflicting sessions scheduled at the same time.
- Dynamic Content: Add rich descriptions, custom content blocks, and sponsor integration for the session detail screen.
- Website Override: Optionally build a separate set of content sections that are shown only on the public website widgets, leaving the in-app session detail untouched (see Website Content Override).
- Click Save to add the session to your schedule.
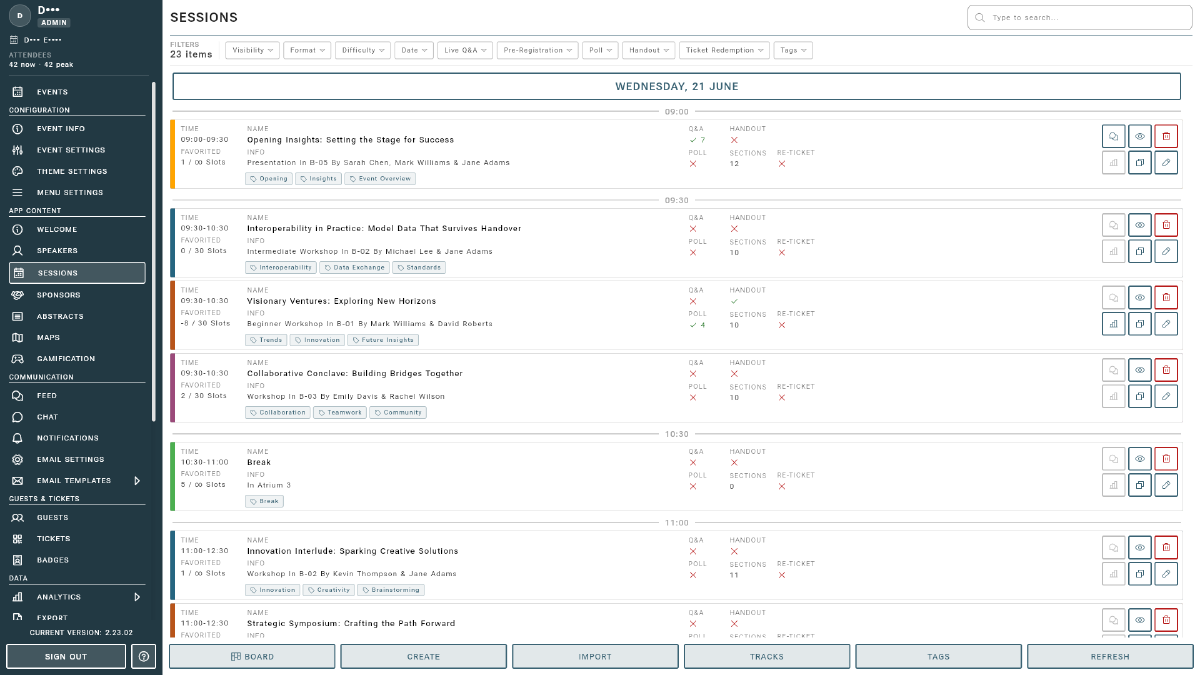
Editing or Removing Sessions
- To edit a session, click the Edit icon next to the session name, update the details, and save.
- To remove a session, click the Delete icon next to the session name.
- Use the Copy icon to duplicate a session with pre-filled details, useful for recurring formats.
Managing Tracks
Tracks let you group sessions by topic, audience, or format, making it easier for attendees to filter the schedule and find relevant content.
- In the Sessions section, click the Tracks button.
- Click CREATE TRACK to add a new track.
- Enter a name for the track (e.g., “Main Stage”, “Workshop Room”, “Technical”).
- Sessions assigned to a track appear under that grouping in the app’s schedule view.
Managing Session Tags
Tags are a lightweight way to label sessions by theme or type (e.g., “Hands-On”, “AI”, “Sponsored”) in addition to their track. Like tracks, tags are drawn from a shared, per-event list so they stay consistent, and they can be used to filter and group sessions on public website widgets.
- On the Sessions page, click the TAGS button to open the session tag list.
- Add, rename, or remove tags to define the vocabulary available for this event.
- Click Save. These tags then appear as selectable options whenever you edit a session.
When editing a session, choose tags from the list in the Tags selector. Typing a tag that does not exist yet creates it on the fly and adds it to the event’s tag list so it becomes reusable for other sessions. Any free-text tags from older events are imported automatically the first time you open the tag list.
Tracks vs. tags: a session belongs to a single track (its place in the schedule grid), but can carry multiple tags (cross-cutting labels). Use tracks for the room/stream and tags for topics or formats.
Website Content Override
By default, the rich Dynamic Content you build for a session is shown both in the companion app and on any public website widgets. If you want the website to show different detail content — for example, a public-facing description that omits internal logistics — enable Override on Website when editing the session and build a separate set of content sections (titles, paragraphs, images, buttons, and speaker/sponsor blocks). When the override is on, the public website widgets render these sections while the in-app session detail continues to use the standard content sections.
Planning Board (Drag-and-Drop Scheduling)
For building and rearranging your programme quickly, switch the Sessions page from the List view to the Board view using the toggle at the top of the page. The board is a visual, drag-and-drop planner, so you can shape the whole schedule without opening each session individually.
- Time-based layout: Each day is a column and the vertical axis is the time of day. Sessions appear as blocks positioned by their start time and sized by their duration, with a shared time ruler down the side.
- Drag to reschedule: Drag a session block to move it to a different time or track. Drag its top or bottom edge to adjust the start or end time. A guide shows exactly where it will land as you drag.
- Tracks side by side: Sessions are laid out into track lanes within each day. Drop a session onto a lane to assign its track, and parallel sessions scheduled at the same time sit next to each other so overlaps stay readable.
- Snap control: Use the snap selector at the top to set the increment that dragging and resizing snap to, from 5 minutes up to 2 hours.
- Unscheduled and no-time areas: Sessions without a date wait in an Unscheduled column; drag them onto a day to schedule them, or drop a scheduled session back to unschedule it. Sessions that have a date but no set time sit in a No-time tray at the top of each day until you place them on the grid.
- Speaker conflict warnings: If the same speaker is booked for two sessions whose times overlap on the same day, the board flags both with a warning, so you can catch double-bookings before publishing.
Changes made on the board are staged, not applied immediately. A summary bar at the bottom lists every pending change; click Save to apply them all at once, or Discard to revert. This lets you experiment freely with the layout and only commit when you are happy with it.
Live Q&A
Event Vault allows you to enable a Live Q&A feature for any session, giving attendees the opportunity to ask questions in real time.
- Enable Live Q&A or Managed Q&A when creating or editing a session.
- Attendees and staff can submit questions via the companion app.
- Questions must be approved by staff or assigned speakers before becoming visible to all attendees.
- Questions can have the following statuses:
- Pending: Only visible to the submitter, staff, and authorized speakers.
- Approved: Visible to all attendees and can be upvoted.
- Rejected: Only visible to the submitter, staff, and authorized speakers (highlighted in red).
- Answered: Visible to all attendees, highlighted in green, with the answer shown below the question.
Live Polls
Enable live polls for sessions to gather instant feedback or run audience votes.
- Enable the Polls feature when creating or editing a session.
- Staff can set up and launch poll questions from within the companion app.
- Attendees access the poll screen in the app and vote on available polls.
- Use the Whitelist button in the session editor to restrict voting to specific people. Type or paste email addresses to add them as tags, remove them individually, or import a whole list from a CSV.
- Addresses do not have to belong to registered attendees yet, so the list can be prepared before your attendees sign up.
- Every poll in the session marked Whitelisted shares that list. To restrict a single question to a smaller group, open the poll and tick Own whitelist, then edit the list for that question alone.
- Changes take effect immediately, including for attendees who already have the poll open.
Proxy voting
A whitelisted poll is a ballot, so anyone on the list can hand their vote to someone else.
- Attendees can assign their own proxy from the poll screen in the app.
- You can also assign one for them from the whitelist editor, using the icon on their tag. Tick All whitelists to cover every ballot they can vote in at this event, or leave it clear to cover only the one you are editing.
- The proxy must be registered for the event, since they have to sign in to cast the ballot.
- You can either type the proxy’s address in full or search for them by name. In the console the search covers your whole attendee list. In the app, attendees can only find people who have made themselves visible in the attendee directory, so no one’s address is shown to someone they have not opted into being listed for. Anyone else can still be named by typing their address.
- In the app the proxy gets a Voting as switch and casts each person’s ballot separately, so the result stays one vote per member.
- A member who votes themselves always wins: their own vote replaces the proxy’s, and once they have voted the proxy is told the ballot is already cast.
- Adding someone to a new whitelist who already votes by proxy elsewhere will prompt you to apply the same arrangement, so a delegated vote is not handed back by accident.
- Each poll shows how many of its ballots were cast by proxy. Expand that line to see which member each proxy voted for. It never shows how anyone voted, so results stay a plain count.
Importing Sessions in Bulk
You can quickly add or update multiple sessions at once by importing a CSV file. This is the recommended method for large events or when migrating data from another system.
- Prepare your session data in a CSV file using the Sample CSV as a template.
- Ensure your CSV file is formatted exactly as shown, with the first row containing the headers in the correct order. Data rows can be empty except for required fields.
- In the Sessions section of the Management Console, click the IMPORT SESSIONS button.
- Choose your CSV file and click Upload to import your sessions.
Session Data Format
Format of the CSV file for importing sessions.
| HEADER | ID | NAME | FORMAT | CAPACITY | LOCATION | START TIME | END TIME | DATE | DIFFICULTY | HANDOUT LINK | HAS Q&A | TINT |
|---|---|---|---|---|---|---|---|---|---|---|---|---|
| FORMAT | String | String | String | Integer | String | String (HH:MM) | String (HH:MM) | String (YYYY-MM-DD) | String | String | String (true/false) | String (HEX Color #FCBA03) |
| CONTAINS | Unique ID | Session Name | Session Format | Session Capacity | Session Location | Session Start Time | Session End Time | Session Start Date | Session Difficulty | A HTTPS URL to a publicly available location | If the session has a live Q&A session | The tint color defined in HEX COLOR FORMAT |
| REQUIRED | YES | YES | YES | YES | YES | YES | YES |
Adding Content to a Session
After the 12 standard columns you can add optional content columns that build the session’s detail page. Each one becomes a content block, in the order the columns appear. Leave a cell empty and no block is created for that session.
Optional content columns for the session import.
| COLUMN | CONTAINS | EXAMPLE |
|---|---|---|
SPEAKER_<Type> |
One or more speaker IDs, comma-separated. <Type> is the label shown above them. |
SPEAKER_Keynote-Speaker with value uKFt1jQ...,kg6TA9q... |
SPONSOR |
A single sponsor ID. SPONSOR_1, SPONSOR_2, … also work when you need more than one. |
SPONSOR with value uKFt1jQ... |
HEADING_<n> |
A plain-text heading | HEADING_1 with value What you will learn |
PARAGRAPH_<n> |
A plain-text paragraph | PARAGRAPH_1 with value Join us for an hour on... |
<Type> on a speaker column must be one of Chair, Moderator, Speaker, Co-Speaker, Panelist, Keynote Speaker, Guest Speaker or Interviewer. Write it with a hyphen instead of a space, for example SPEAKER_Keynote-Speaker.
The IDs you reference must already exist in this event, so import your speakers and sponsors before your sessions. If any ID is not found the import stops and tells you which one, and nothing is written.
What the Import Does Not Change
Some session settings have no CSV column, and re-importing a file will not reset them: track, tags, synopsis, the pre-registration and poll toggles, the publish (unlisted) state, the ticket-redemption settings and the website-only content override. Those stay as you set them in the console. Subscribers and subscriber counts are never touched either.
This means you can safely re-import a corrected file to fix a typo without losing work done in the console.