Managing Event Sponsors
How to add and manage sponsors for your event.
Sponsors are essential for supporting your event. Event Vault provides tools to add, organize, and showcase sponsors to your attendees — including flexible carousel placements and tier-based grouping.
Accessing the Sponsors Section
- Log in to the Management Console.
- Select your event, then choose Sponsors from the navigation menu.
Adding a New Sponsor
- Click the CREATE SPONSOR button at the bottom of the Sponsors page.
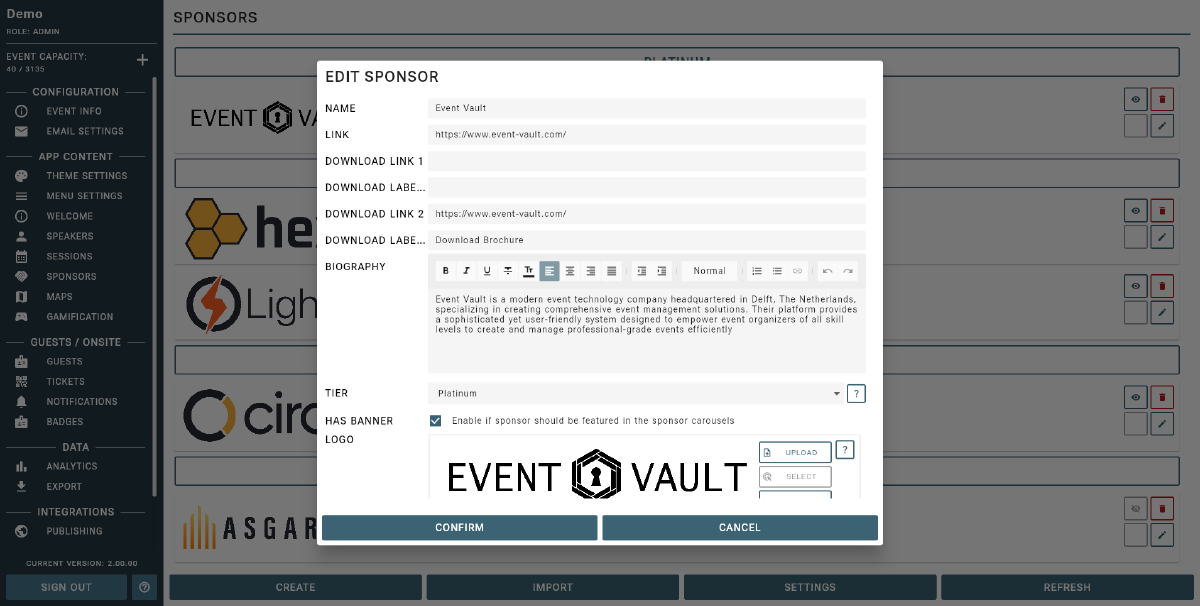
- Enter the sponsor details:
- Name: Name of the sponsoring organization.
- Link: URL to the sponsor’s website or landing page.
- Tier: Sponsorship tier (configured in Tiers & Settings).
- Has Banner: Toggle on to include this sponsor in carousels; toggle off to show in overview only.
- Logo/Banner: Upload the sponsor’s logo and optional banner image.
- Labels: Optional download button labels and associated URLs (e.g., a brochure or case study link).
- Click Save to add the sponsor to your event.
Editing or Removing Sponsors
- To edit a sponsor, click the Edit icon next to their name, update the details, and save.
- To remove a sponsor, click the Delete icon next to their name.
Configuring Tiers & Settings
Click the TIERS & SETTINGS button to manage sponsorship tiers and display options for your event.
Tiers
Define up to ten sponsorship tiers, each with a custom label (e.g., Gold, Silver, Platinum, Community Partner). Sponsors are grouped by tier in the app’s sponsor section, with higher-indexed tiers appearing first.
Schedule Carousel
Show sponsor banners in the session schedule view. Configure:
- Top of Day — display a sponsor banner at the top of each day’s schedule.
- Interval mode — display a sponsor banner every X sessions. Set the Interval Count to control the frequency.
Speaker Page Carousel
Show sponsor banners in the speakers section of the app.
Guest List Carousel
Show sponsor banners in the networking guest list section.
Navigation Sponsor
Display a sponsor logo or banner at the bottom of the app’s main navigation menu. Options include:
- A single featured sponsor
- A rotating carousel of multiple sponsors
- A customizable label displayed above the sponsor
Carousel Timer
Set how quickly sponsor banners rotate in carousels (in seconds).
Importing Sponsors in Bulk
You can quickly add or update multiple sponsors at once by importing a CSV file. This is the recommended method for large events or when migrating data from another system.
- Prepare your sponsor data in a CSV file using the Sample CSV as a template.
- Ensure your CSV file is formatted exactly as shown, with the first row containing the headers in the correct order. Data rows can be empty except for required fields.
- In the Sponsors section of the Management Console, click the IMPORT SPONSORS button.
- Choose your CSV file and click Upload to import your sponsors.
Sponsor Data Format
Format of the CSV file for importing sponsors.
| HEADER | ID | NAME | TIER | LINK | HAS BANNER | LOGO URL | BANNER URL |
|---|---|---|---|---|---|---|---|
| FORMAT | String | String | Integer (0-9) | String (HTTPS) | String (true/false) | String (HTTPS) | String (HTTPS) |
| CONTAINS | Unique ID | Sponsor Name | Sponsor Tier Index | Sponsor Link | If the Sponsor shows up in the Carousel | A HTTPS URL to a publicly available image | A HTTPS URL to a publicly available image |
| REQUIRED | YES | YES | YES | YES | YES | YES |