EVENT SETUP
SYSTEM OVERVIEW
The Event Vault system is comprised of two primary components: the Management Console and the Companion App. The Management Console is accessible via web browsers on laptops, desktops, and tablets. This platform enables you to configure your event according to your preferences. On the other hand, the Companion App, available on iOS and Android, serves as the interface for attendees to engage with your event's digital elements and access control.
MANAGEMENT CONSOLE
The Management Console provides a comprehensive platform for configuring all aspects of your event. You can populate the database with event data either manually or by uploading .CSV files.
Once you purchase an event package from us, your account will be granted administrative privileges, allowing you to create events within the console. The process for event creation may vary depending on the specific service package you have selected.
COMPANION APP
The Companion App offers varying functionalities depending on the service package you've purchased. Regardless of the package, the app serves as the primary tool for both your staff and attendees to access and interact with event information. This includes features such as customizing schedules, interacting with other participants, sharing contact information, providing feedback, and utilizing digital tickets for event access.
GETTING STARTED
Once you have received your login details from us you can get started on creating your events we provide this guide to get your started and guide you through all the systems features and functionality. To get started login to the management console.
Upon reaching the login page, input your assigned credentials into the corresponding fields and click on the 'Login' button. If an account matches the provided credentials, you will be directed to the event overview screen. This screen displays the current status of your event and attendee capacity. Should you need to increase these limits, please reach out to us for assistance. At this time, we do not offer automated transaction services, although we are actively working on implementing this feature.
For users with either the SINGLE or MULTI EVENT package, it is essential to access the login screen from your assigned domain (<clientId>.event-vault.com) to access your specific service package. If you are using the INSTANT EVENT package, you can directly use console.event-vault.com
Event Creation
This section provides a step-by-step guide to setting up your event after logging into the Management Console. Upon login, you will encounter a screen divided into two main areas. On the left, represented by a blue column, you'll find the navigation pane. This displays your current role within the organization and the account to which you are logged in. Beneath this, you will see additional navigation options when you are inside an event. This area also shows your current number of events, available event slots, and guest capacity. Both event slots and guest capacity can be expanded by purchasing more at any time, and these resources can be allocated across your events as needed.
On the right side of the screen is the content pane, which displays the title at the top and the relevant content beneath it. In this instance, the content consists of an overview of all your created events. Clicking on an event will allow you to modify its various aspects. At the bottom of the screen, you will find the action bar that displays all available actions related to the current page.
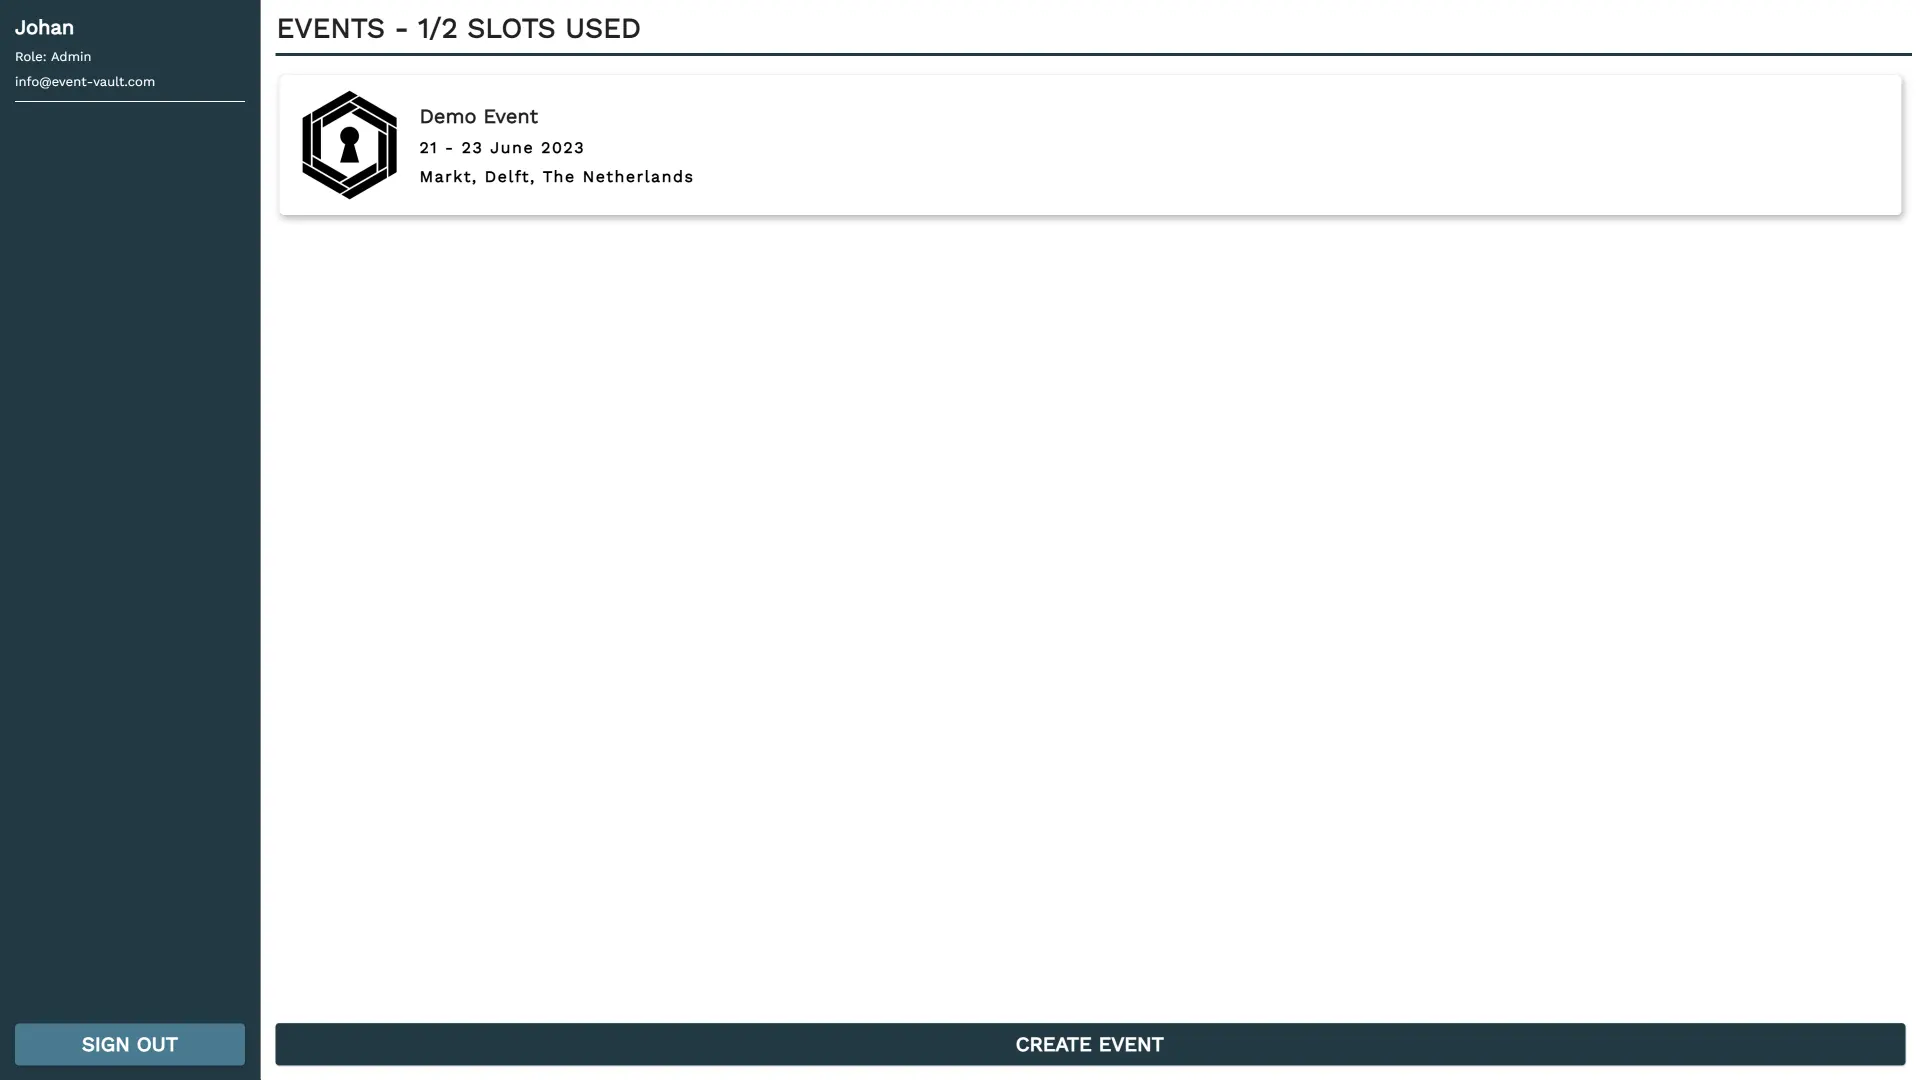
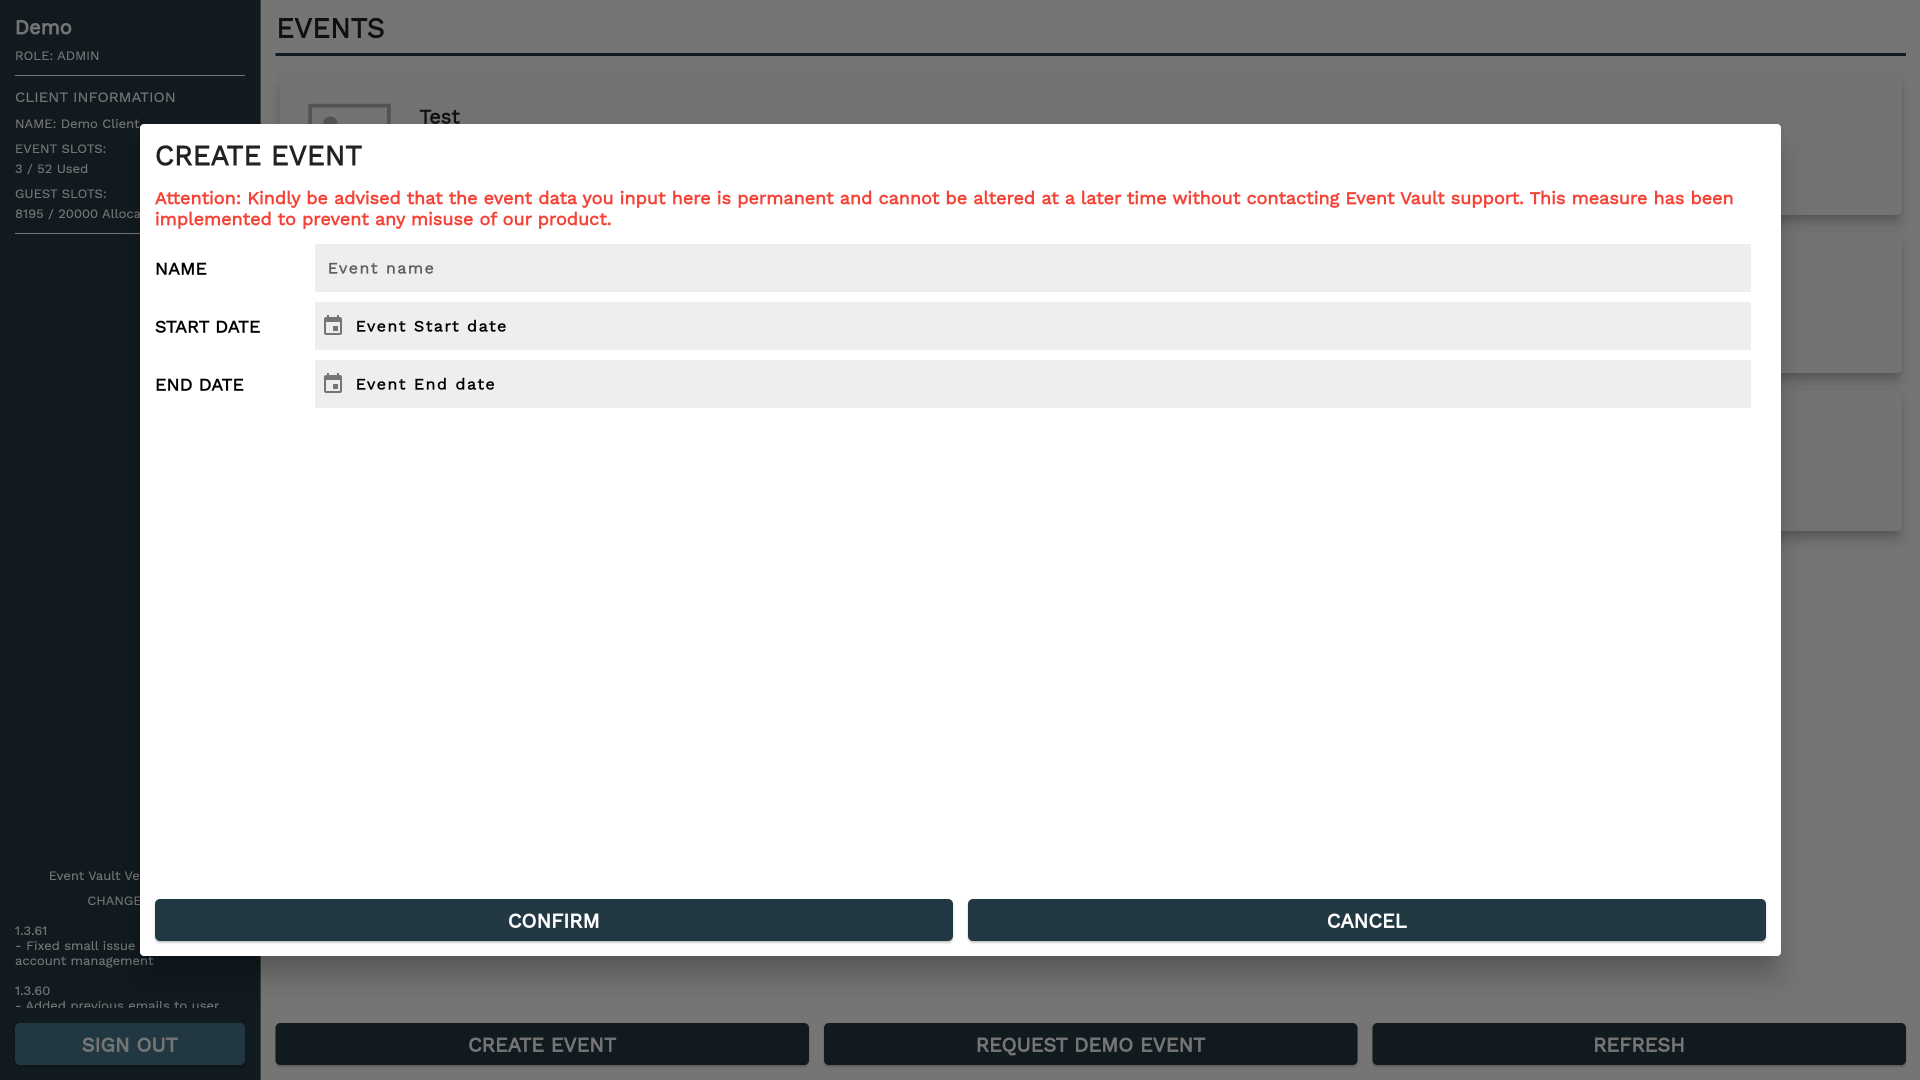
To start a new event, click on the 'CREATE EVENT' button found in the Action Bar. This will open an interface, as illustrated in the accompanying image, where you can enter your event's name, along with its start and end dates. After clicking 'Confirm,' the new event will appear in your event overview. To proceed with further setup, click on the newly created event.
Please be aware that these three fields are not editable once set, unless you request assistance from our support team. This measure is in place to prevent system exploitation, and we appreciate your understanding.
Upon clicking an event, you will be directed to that event's 'Event Info' page as shown below. Additionally, the navigation menu will populate with links to all other relevant pages for this event. On the 'Event Info' page, you can specify:
AVAILABLE FIELDS
| FIELD | DESCRIPTION |
|---|---|
| EVENT LOCATION | Indicate the geographical location where the event will take place. This is shown on the event info page in the app as well as the events overview list |
| TIME ZONE | Select the time zone appropriate for your event. This setting will affect the timing of notifications sent out related to the event. |
| CODE ENTRY | Enable this option if you wish to make your event public, allowing individuals to gain access by entering the designated code. |
| DESCRIPTION | Input a greeting or introductory text, which will be displayed on the event's cover page within the companion app. |
| THEME COLOR | Select a color that will be used to theme the companion app in various ways. |
| COVER IMAGE | Upload an image that will serve as the event's cover photo within the companion app. |
| EMAIL SETTINGS | |
| SUPPORT EMAIL | The email listed when users try to request support via the the app settings menu |
| SENDER NAME | The name of the sender in email comunications |
| SENDER EMAIL | The email from which email communications are sent |
| BANNER IMAGE | The URL for the image used in email communication as the banner above the email. |
| APP NAME | The name of the app in email comunications |
| EVENT NAME | The name of the event in email comunications |
| TEAM NAME | The name of the event team in email comunications |
| IOS LINK | The download link of the IOS app |
| ANDROID LINK | The download link of the Android app. |
| FEATURE SETTINGS | |
| SPONSOR PAGE | Toggle to disable the sponsor overview page |
| SPEAKER PAGE | Toggle to disable the speaker overview page |
| MAP PAGE | Toggle to disable the map system |
| TICKET SYSTEM | Toggle to disable the ticketing system |
The time zone property must be set correctly before any notifications are scheduled. Please be careful about summer/winter time zone adjustments when doing so.
Any modifications you make can be confirmed by clicking the 'SAVE CHANGES' button. If you wish to undo your changes before saving, simply click the 'RESTORE' button.
.png?h=50eafc0a39088553afdf58c18fe7a6b6)
SPEAKERS
This section provides a step by step guide on how to add speakers to your event, to start first navigate to the speakers page via the Navigation Menu on the left, once there you should see a list of speakers if you already have some as shown below or a blank list. At the right of the screen you can find a search bar that will allow you to quickly find a speaker if you have a lot of them. At the bottom you should see 2 buttons, CREATE SPEAKER and REFRESH,
.png?h=2e7a22101324555ba3b5cae1787f243f)
To begin, click the 'CREATE SPEAKER' button, which will open the speaker creation menu as depicted in the image below. This menu allows you to fill in various fields, outlined as follows:
AVAILABLE FIELDS
| FIELD | DESCRIPTION |
|---|---|
| NAME | Enter the speaker's name here. |
| ROLE | Input the speaker's current role, if applicable. |
| COMPANY | Specify the name of the speaker's current company, if applicable. |
| ACCOUNT EMAIL | If the speaker has registered for the Companion App, provide the associated email account. This is required to grant additional privileges in the Live Q&A system. |
| BIOGRAPHY | Include a brief description or background information about the speaker. |
| IMAGE | Upload a profile picture of the speaker |
.png?h=c7c5a0d0f525b126e507469cdf547c21)
To modify or remove a speaker after they have been added, locate the corresponding 'Edit' or 'Delete' icon next to each speaker's name in the speaker list. Clicking these icons will enable you to edit the speaker's details or remove them from the event.
SESSIONS
This section provides a step by step guide on how to add sessions to your event, to start first navigate to the sessions page via the Navigation Menu on the left, once there you should see a list of sessions if you already have some as shown below or a blank list. At the right of the screen you can find a search bar that will allow you to quickly find a session if you have a lot of them. At the bottom you should see 2 buttons, CREATE SESSION and REFRESH, Sessions will be shown grouped by day and time slot.
.png?h=f0fce3f313e115a802c2a2f21c4887bd)
To initiate the creation of a new session, click the 'CREATE SESSION' button. This will bring up the session creation menu, as illustrated in the accompanying image. You can populate various fields in this menu, described as follows:
AVAILABLE FIELDS
| FIELD | DESCRIPTION |
|---|---|
| NAME | Input the name of the session. |
| FORMAT (OPTIONAL) | Specify the format of the session if applicable. |
| CAPACITY | Indicate the maximum number of attendees for this session. Set this to 0 for unlimited capacity. Once the limit is reached, attendees will no longer be able to add this session to their personal schedules. |
| LOCATION (OPTIONAL) | If relevant, indicate where the session will take place. |
| START TIME | Define when the session will commence. |
| END TIME | Specify when the session will conclude. |
| DATE | Indicate the date of the session. |
| DIFFICULTY (OPTIONAL) | Describe the complexity of the session's content or its intended audience. |
| HANDOUT LINK (OPTIONAL) | Specify a handout download link in HTTPS format. |
| LIVE Q&A | Enable or disable the live Q&A functionality for this session. |
| MANAGED Q&A | Enable approval requirement for Q&A questions before they become visible |
| POLL | Enable the poll feature for this session, questions can be created from within the companion app. |
| POLL WHITELIST | Upload an email CSV to only allow whitelisted users to cast votes in the poll, see the format below. |
| DYNAMIC CONTENT SYSTEM | Create your customized session content with the TITLE, PARAGRAPH, SPONSOR and SPEAKER segments that you can add as you wish. |
.png?h=948f4740ac664e7996e0aab591621209)
To edit or delete a session after its creation, find the respective 'Edit' or 'Delete' icons adjacent to each session name in the session list. Clicking these icons allows you to alter the session's attributes or remove it entirely from the event. Additionally, clicking the 'Copy' icon will open a 'Create Session' dialog, wherein key fields from the selected session are pre-filled for your convenience.
SPONSORS
This section provides a step by step guide on how to add sponsors to your event, to start first navigate to the sponsors page via the Navigation Menu on the left, once there you should see a list of sponsors if you already have some as shown below or a blank list. At the right of the screen you can find a search bar that will allow you to quickly find a sponsor if you have a lot of them. At the bottom you should see 2 buttons, CREATE SPONSOR and REFRESH,
.png?h=ea6eeac8f0d244bdc4c9589a97c36015)
To commence the addition of a new sponsor, click the 'CREATE SPONSOR' button. This action will display the sponsor creation menu, as shown in the accompanying image. In this menu, you have the option to fill in various fields, which are outlined below:
AVAILABLE FIELDS
| FIELD | DESCRIPTION |
|---|---|
| NAME | Input the name of the sponsoring organization. |
| LINK | Provide the URL for the sponsor's website or relevant landing page. |
| LABEL 1 | Provide the Label and URL for an optional download button on the sponsor |
| LABEL 2 | Provide the Label and URL for a second optional download button on the sponsor |
| TIER | From the dropdown menu, select the sponsorship tier that corresponds to the sponsor. These tiers are configured in the 'Tiers Menu.' |
| HAS BANNER | Check this box if the sponsor should show up in the Sponsor Carousels or only in the sponsor overview. |
| SPONSOR LOGO | Upload the logo of the sponsor, which will be displayed on the sponsor page. |
| SPONSOR BANNER | Include a banner image to be displayed in the sponsor carousels. |
To modify or remove a sponsor after they have been added, locate the corresponding 'Edit' or 'Delete' icon next to each sponsor in the sponsor list. Clicking these icons will enable you to edit the sponsor's details or remove them from the event.
.png?h=dcc26f1a74b5280825f592bc8ffd82b7)
Click the 'TIERS & SETTINGS' button to configure the sponsorship tiers & settings for your event. Here you can modify the following settings as shown in the image and table below:
AVAILABLE FIELDS
| FIELD | DESCRIPTION |
|---|---|
| TOP OF DAY | Show a sponsor carousel at the top of each day in the schedules (Not recommended in combination with Interval) |
| ENABLE INTERVAL | Show a sponsor carousel every X elements on the page(Not recommended in combination with Top Of Day) |
| INTERVAL COUNT | The amount of elements between each sponsor carousel on the page |
| ENABLE NAVIGATION | Show a sponsor carousel at the bottom of the navigation menu. |
| TIERS | You have the option to specify up to six different tiers. Renaming these tiers can be done at any time and will not affect existing sponsors; their associated tier will automatically update to reflect the new name you set. |
.png?h=26971d3808930a69e6f9a560aa23c33a)
MAPS
This section provides a step by step guide on how to add maps to your event, to start first navigate to the maps page via the Navigation Menu on the left, once there you should see a list of maps if you already have some as shown below or a blank list. At the bottom you should see 2 buttons, CREATE MAP and REFRESH,
.png?h=6ab43cebc32bc6c41174d491289b68bd)
To begin the process of adding a new map, click the 'CREATE MAP' button. This action will open the map creation menu, as depicted in the accompanying image. You can fill in the following fields within this menu:
AVAILABLE FIELDS
| FIELD | DESCRIPTION |
|---|---|
| NAME | Input the name of the map for easy identification. |
| SORT NR | Provide a number that will determine the order in which the map appears in relation to other maps. Lower numbers will appear first. |
| IMAGE | Upload the map image that attendees will see when navigating the event. |
These details will be displayed when someone views the map information within the event interface.
.png?h=5e06dcc302109804a68a91fae9b33b7e)
To modify or remove a map after they have been added, locate the corresponding 'Edit' or 'Delete' icon next to each map in the map's list. Clicking these icons will enable you to edit the map's details or remove them from the event.
INVITATIONS & ACCESS
This section provides a step by step guide on how to add guests to your event, to start first navigate to the Guests page via the Navigation Menu on the left, once there you should see a list of Guests if you already have some as shown below or a blank list. At the bottom you should see 3 buttons, INVITE GUESTS, SEND INVITATIONS and REFRESH. Each guest has a nr of email status's which show the current status of the invitation email, if it has arrived and been opened and such. In addition the email logs can be viewed.
Guest data can be transferred to a different email if needed if the user does not have access to their account. In addition if for some reason the Verification Email does not arrive the user can be forcefully verified from the console.
.png?h=f3e614e9ec891b2180ad8fcfeafaba97)
To add guests to your event, select the 'INVITE GUESTS' button. This action opens the guest invitation interface, as shown in the accompanying image. You can import guest data from a CSV file, which also enables pre-filling their Digital Card information.
Using the OVERWRITE EXISTING DATA toggle should only be used if you made a mistake on the import, This will overwrite the digital card data of all guests in the CSV even if the guest adjusted it themselves.
DATA FORMAT
The CSV file must use a comma (,) as the delimiter, with all fields in text/string format. For data formatting please see the table below. All headers must be present, even if not all are used. Except for the EMAIL field in column (A), all other fields (B to F) are optional. The file should only contain the header row and the rows of data below it, with no additional content. Download Example File (Open with notepad to see and check formatting)
| COLUMN | A | B | C | D | E | F | G | H |
|---|---|---|---|---|---|---|---|---|
| HEADER | NAME | SURNAME | ORG | ROLE | TEL | URL | COUNTRY | |
| FORMAT | HTTPS | |||||||
| CONTAINS | Guest Email | Guest Full Name or First Name | Guest Surname | Guest Organization | Guest Role | Guest Phone Nr with Country code if available (Example: +31612160351) | A URL That the guest could set or if they specified anything during sign up. | Guests country or origin |
| REQUIRED | YES |
Additionally, you can make your event accessible to the public by enabling the code access feature on the 'Event Info' page. For further details on this functionality, please refer to the Event Creation section.
.png?h=ff25b29ac6f307508694e2121c7bdcf4)
To modify or remove a guest after they have been added, locate the corresponding 'Delete' icon next to each guest in the guest's list. Clicking these icons will enable you to edit the guest's details or remove them from the event. Pressing the 'Send' icon will send an invite email to the guest.
TICKETS
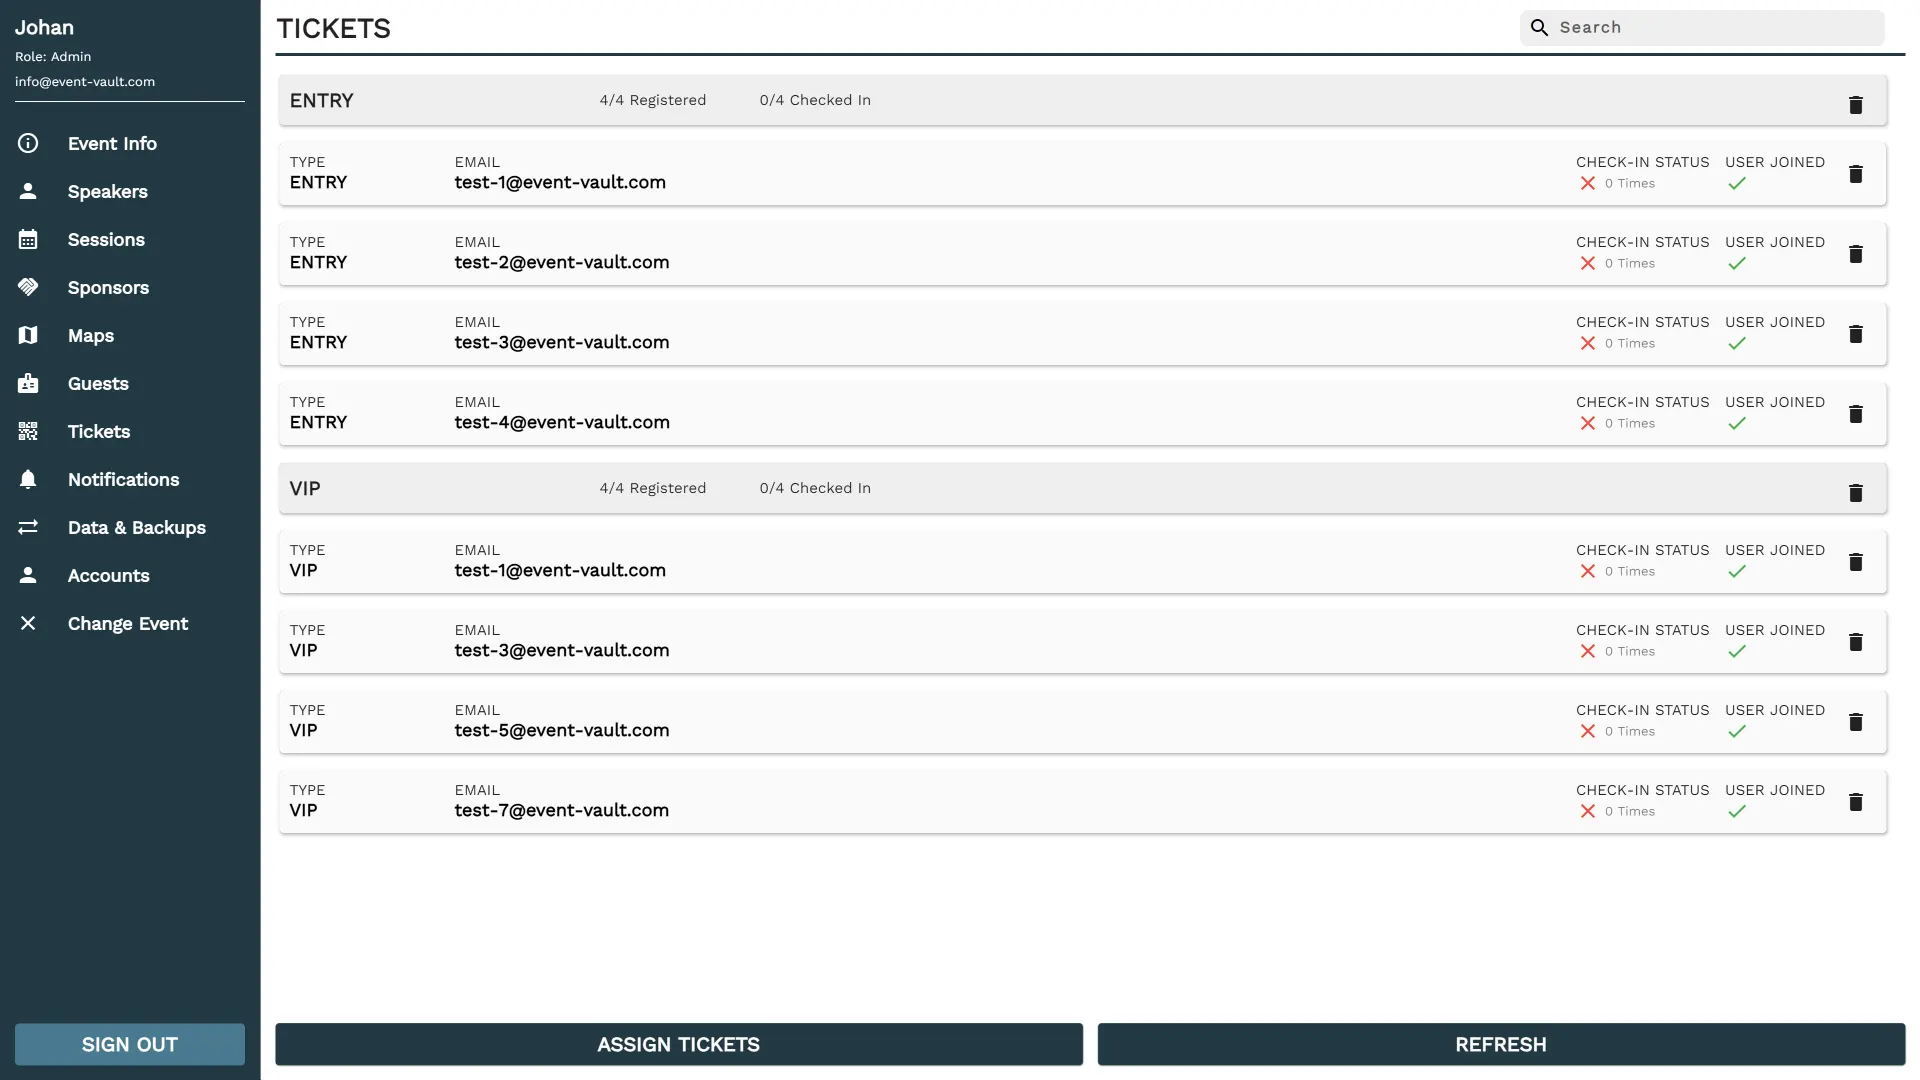
This section provides a step-by-step guide on how to add tickets to your event. To start, first navigate to the tickets page via the Navigation Menu on the left. Once there, you should see a list of tickets if you have already created some, as shown below, or a blank list if you haven't. At the bottom of the page, you should see two buttons: 'ASSIGN TICKETS' and 'REFRESH'.
Each ticket displays the current check-in status, indicating whether a user has joined the event through any of the methods outlined in the Invitations and Access section. Users can be checked in via the companion app, and the number of check-ins can be used to validate tickets. See the Event Management section for details.
This system is designed to provide maximum flexibility with any payment system you are currently using, as it only requires email addresses for ticket issuance.
To start issuing tickets for your event, click the 'ASSIGN TICKETS' button. This will open the ticket issuing menu, as illustrated in the accompanying image. Here you can input the following fields:
To remove a ticket after it has been created, locate the 'Delete' icon next to each ticket in the ticket list. Clicking this icon will remove the ticket from the event.
AVAILABLE FIELDS
| FIELD | DESCRIPTION |
|---|---|
| GUEST EMAIL CSV | Select the CSV file which contains the assignable email addresses, see the DATA FORMAT section for the structure. |
| TICKET TYPE | Specify the ticket which you would like to assign (This can be anything you want) |
DATA FORMAT
The CSV file must use a comma (,) as the delimiter, with all fields in text/string format, Each entry should be on a new row. For data formatting please see the table below. Download Example File (Open with notepad to see and check formatting)
| COLUMN | A |
|---|---|
| FORMAT | String |
| CONTAINS | Guest Email adress |
We currently do not offer a built-in purchasing system for tickets. However, we are actively working on developing one that you can opt to use in the future. In the meantime, our flexible system allows you to integrate with any existing payment or ticketing solution you may already be using.
EVENT MANAGEMENT
This section provides a guide to the system features for use during and shortly before the event.
PUsh Notifications
This section offers a step-by-step guide on how to add notifications to your event. To begin, navigate to the 'Notifications Page' through the Navigation Menu on the left-hand side. Once there, you should see a list of existing notifications, as depicted below, or an empty list if no notifications have been added yet. At the bottom of the page, you will find two buttons: 'CREATE NOTIFICATION' and 'REFRESH'.
.png?h=ee24b5241e3b97c451a41bf98511675c)
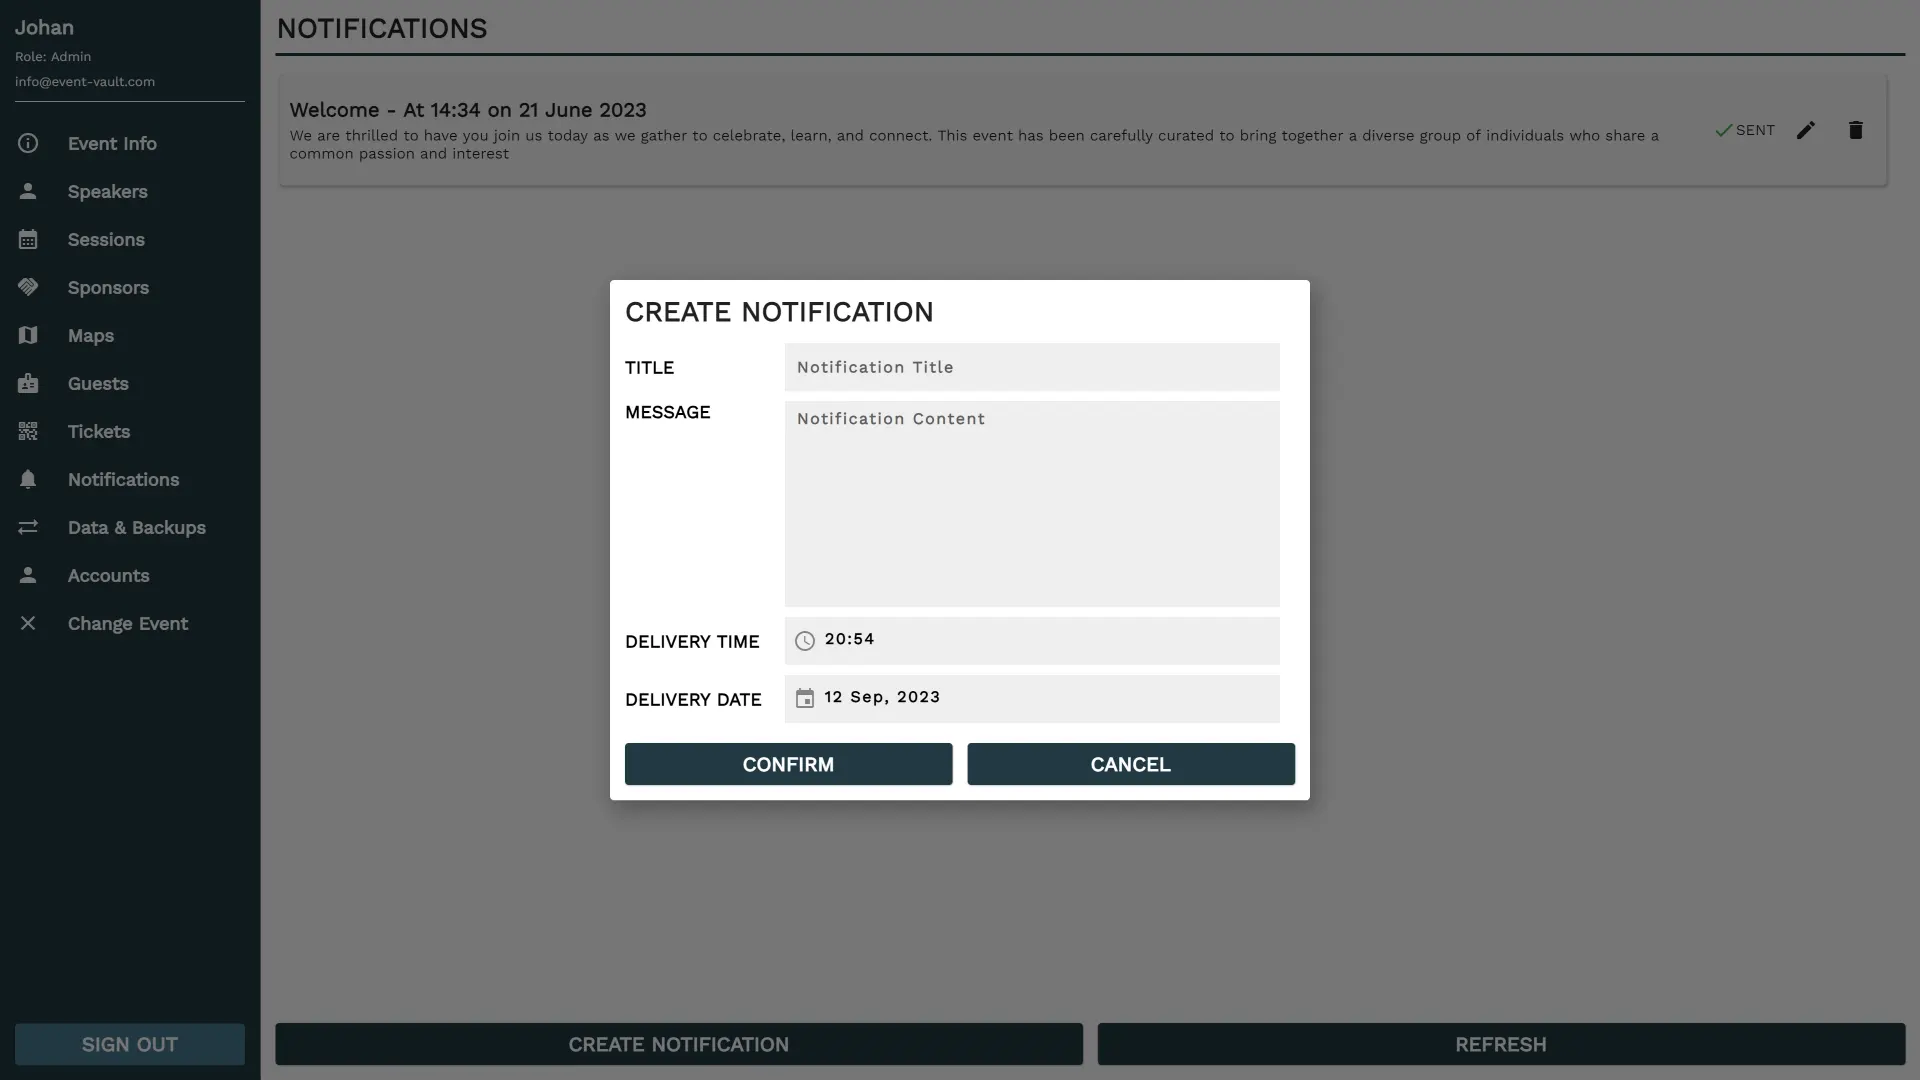
To initiate the process of creating a new notification, click the 'CREATE NOTIFICATION' button. This will open the notification creation menu, as illustrated in the accompanying image. Within this menu, you can populate the following fields:
AVAILABLE FIELDS
| FIELD | DESCRIPTION |
|---|---|
| TITLE | Input the title of the notification for clear identification. |
| MESSAGE | Provide the message content that will be delivered to the guests. |
| DELIVERY TIME | Specify the time at which the notification will be sent. * |
| DELIVERY DATE | Indicate the date on which the notification will be dispatched. |
Each notification you create will display a status, indicated by either a green checkmark for 'Sent' or a red cross for 'Not Sent'. Notifications can be modified up until the point they are dispatched.
* The delivery time for notifications is in local time, based on the time zone you selected on the 'Event Info' page. For more details on setting the time zone, please refer to the 'Event Creation' page. Editing can also only be done up to the point where the notification is sent out.
To modify or remove a notification after it has been created, locate the corresponding 'Edit' or 'Delete' icon next to each notification in the notification list. Clicking these icons will enable you to edit the notification's details or remove it from the event.
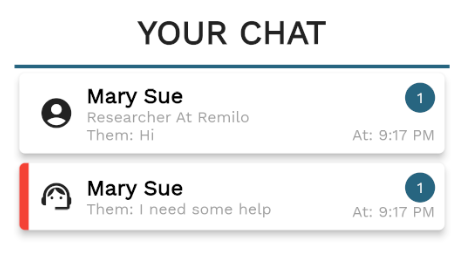
CHAT
When chat has been enabled for the event users have the option to contact support via the chat page. This conversation will show up for all staff members as a support chat, see the image shown. On opening the support conversation you can respond to the guest. If you deem the conversation to be completed you can open the context menu by pressing the 3 dots in the top right and choose to mark the support request as resolved. this will hide the chat from the overview until the guest sends another message.
In the case that the guest is spamming or misusing the system you may also block them with the same context menu
Generally it is not advised to have more than 2 people responding to Support messages to avoid double responses.
LIVE Q&A
When enabled for a session as referred to in Sessions will enable an extra button on the session inside the companion app. Upon clicking this button staff members and guests will be presented with the image below:
Guests as well as Staff members will be able to ask questions here. Before a question is visible to others it needs to be approved by either a staff member or the speaker for the session if the email has been setup as mentioned in Speakers. Long pressing on any question will open a context menu which allows authorized users to modify the status of any question.
See the overview below for an explanation about each status.
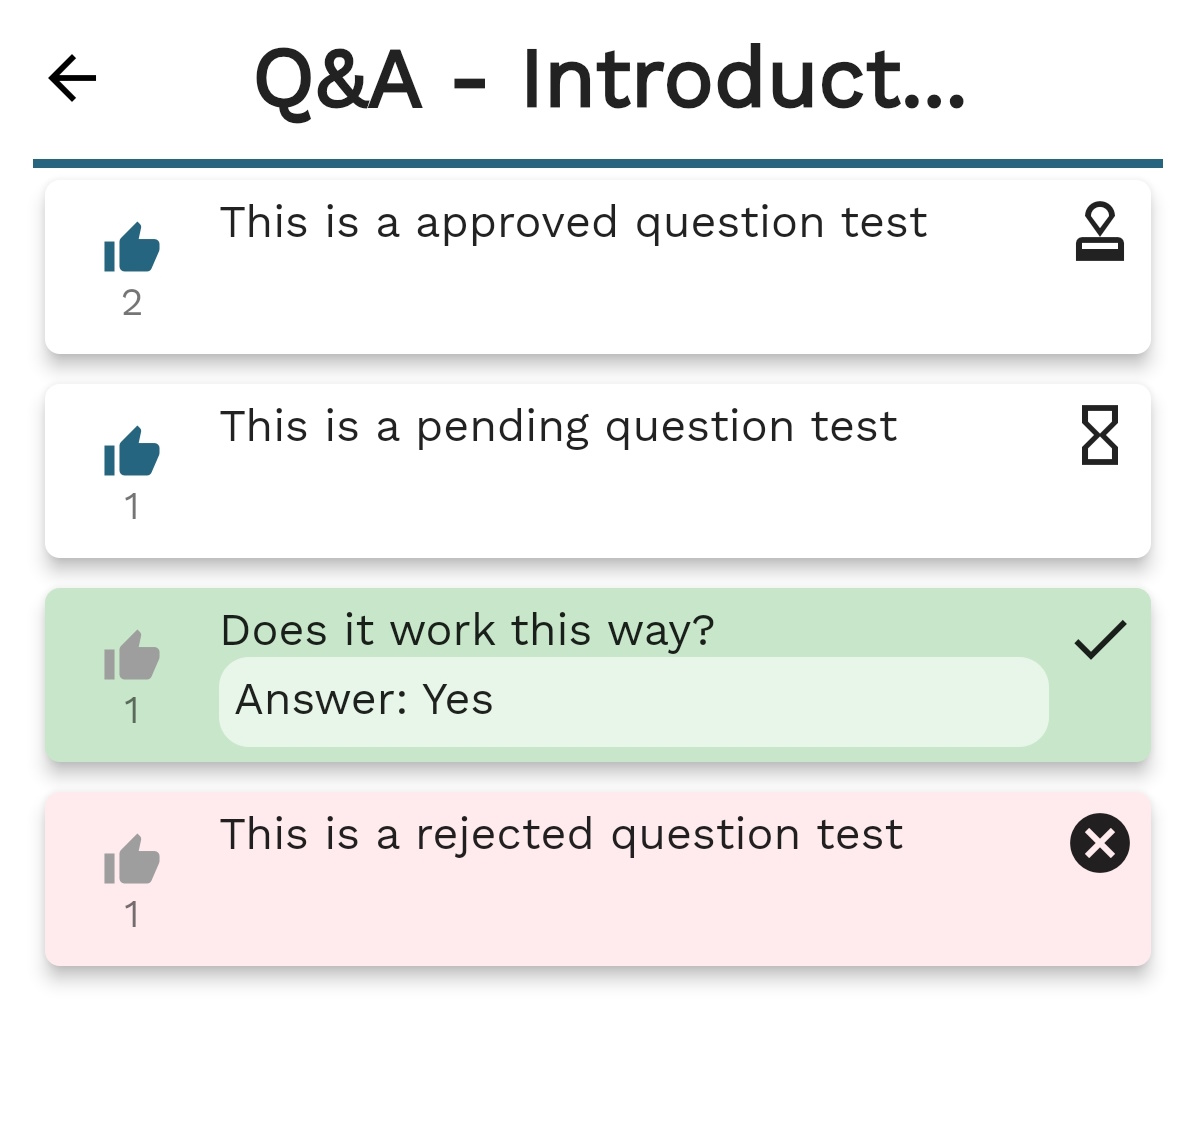
AVAILABLE FIELDS
| STATUS | DESCRIPTION |
|---|---|
| PENDING | Pending question are only visible to the person who asked the question as well as staff members and the speaker if they have been given authorization as stated before. |
| APPROVED | Approved question are visible to all users who are viewing the Q&A, these can be upvoted by pressing the thumbs up icon to move them up in the ranking. |
| REJECTED | Rejected questions are only visible to the person who asked the question as well as staff members and the speaker if they have been given authorization as stated before. Rejected questions are highlighted in red and will be moved to the bottom of the list to make it less cluttered. |
| ANSWERED | Answered questions are visible to all and highlighted in green. If an answer has been supplied while marking the question this will also been shown below in a lighter shade of green. |
LIVE POLL
When enabled for a session as referred to in Sessions will enable an extra button on the session inside the companion app. Upon clicking this button guests will be taken to the poll screen, Here they can see any polls that have been setup by staff. These must be setup from within the companion app.
DATA MANAGEMENT
In this section, we provide a guide on import and export data from the event system.
DATA IMPORT
In this section, we will discuss importing event data from CSV files, including Session and Speaker Data. First, access the "Import & Export" screen through the navigation menu on the left. The interface should be visible as shown below.
.png?h=fd10e2a16b775b702f4547dc217ea770)
To import Sessions and Speakers, navigate to the "Event Data" section and click the "IMPORT" button. This action will open a dialog with the necessary inputs as shown below.
AVAILABLE FIELDS
| FIELD | DESCRIPTION |
|---|---|
| SPONSORS CSV | Allows you to select the CSV file containing your sponsor data |
| SPEAKERS CSV | Allows you to select the CSV file containing your speaker data |
| SESSIONS CSV | Allows you to select the CSV file containing your session data |
If the format of your CSV data is correct, the "SELECT" text will change to a success message indicating proper data formatting. Refer to the "DATA FORMATING" section for guidance on formatting your CSV. After pressing "CONFIRM", the import process will begin, and a success message will appear if the import was successful.
DATA FORMAT SPONSORS CSV
The CSV file must use a comma (,) or dot comma (;) as the delimiter. For data formatting please see the table below. All headers must be present, even if not all are used. The file should only contain the header row and the rows of data below it, with no additional content. Download Example File (Open with notepad to see and check formatting)
| COLUMN | A | B | C | D | E | F | G |
|---|---|---|---|---|---|---|---|
| HEADER | ID | NAME | TIER | LINK | HAS BANNER | LOGO URL | BANNER URL |
| FORMAT | String | String | Integer (0-5) | String (HTTPS) | String (true/false) | String (HTTPS) | String (HTTPS) |
| CONTAINS | Unique ID | Sponsor Name | Sponsor Role Index | Sponsor Link | If the Sponsor shows up in the Carousel | A HTTPS URL to a publicly available image | A HTTPS URL to a publicly available image |
| REQUIRED | YES | YES | YES | YES | YES | YES |
DATA FORMAT SPEAKERS CSV
The CSV file must use a comma (,) or dot comma (;) as the delimiter. For data formatting please see the table below. All headers must be present, even if not all are used. The file should only contain the header row and the rows of data below it, with no additional content. Download Example File (Open with notepad to see and check formatting)
| COLUMN | A | B | C | D | E | F | G |
|---|---|---|---|---|---|---|---|
| HEADER | ID | NAME | ROLE | COMPANY | BIOGRAPHY | IMAGE URL | |
| FORMAT | String | String | String | String | String | String | String (HTTPS) |
| CONTAINS | Unique ID | Speaker Name | Speaker Role | Speaker Company | Speakers Email (Provides additional authority) | A short biography | A HTTPS URL to a publicly available image |
| REQUIRED | YES | YES | YES |
DATA FORMAT SESSION CSV
The CSV file must use a comma (,) or dot comma (;) as the delimiter. For data formatting please see the table below. All headers must be present, even if not all are used. The file should only contain the header row and the rows of data below it, with no additional content. Download Example File (Open with notepad to see and check formatting)
| COLUMN | A | B | C | D | E | F | G | H | I | J | K | L |
|---|---|---|---|---|---|---|---|---|---|---|---|---|
| HEADER | ID | NAME | FORMAT | CAPACITY | LOCATION | START TIME | END TIME | DATE | DIFFICULTY | HANDOUT LINK | HAS Q&A | TINT |
| FORMAT | String | String | String | Integer | String | String (HH:MM) | String (HH:MM) | String (YYYY-MM-DD) | String | String | String (true/false) | String (HEX Color #FCBA03) |
| CONTAINS | Unique ID | Session Name | Session Format | Session Capacity | Session Location | Session Start Time | Session End Time | Session Start Date | Session Difficulty | A HTTPS URL to a publicly available location | If the session has a live Q&A session | The tint color defined in HEX COLOR FORMAT |
| REQUIRED | YES | YES | YES | YES | YES | YES | YES |
In addition to the above columns the session CSV also support the dynamic content system which will structure the actual text content of the session as well as any Speakers or Sponsors you would like to showcase there. These columns should be places at the end of the CSV from column L and onwards.
The session content is created dynamically based on the header specified and then structured in order from left to right. Valid headings are shown below
| HEADER NAME | USE | FORMAT | CONTAINS |
|---|---|---|---|
| HEADING | Adds a heading to the session | String | Text to use as heading |
| PARAGRAPH | Adds a paragraph section to the session, Can be further styled once imported | String | Text to display in paragraph |
| SPONSOR | Adds a dedicated sponsor spot | String | Sponsor ID |
| SPEAKER_CHAIR | Adds a speaker section for the category | String (id or id,id,id) | Speaker Id or list of Speaker Ids |
| SPEAKER_MODERATOR | Adds a speaker section for the category | String (id or id,id,id) | Speaker Id or list of Speaker Ids |
| SPEAKER_SPEAKER | Adds a speaker section for the category | String (id or id,id,id) | Speaker Id or list of Speaker Ids |
| SPEAKER_CO-SPEAKER | Adds a speaker section for the category | String (id or id,id,id) | Speaker Id or list of Speaker Ids |
| SPEAKER_PANELIST | Adds a speaker section for the category | String (id or id,id,id) | Speaker Id or list of Speaker Ids |
| SPEAKER_KEYNOTE-SPEAKER | Adds a speaker section for the category | String (id or id,id,id) | Speaker Id or list of Speaker Ids |
| SPEAKER_GUEST-SPEAKER | Adds a speaker section for the category | String (id or id,id,id) | Speaker Id or list of Speaker Ids |
| SPEAKER_INTERVIEWER | Adds a speaker section for the category | String (id or id,id,id) | Speaker Id or list of Speaker Ids |
API INTEGRATIONS
We currently have some limited API integration functionality. These will become available in due time and will be documented here.
ADD GUEST
To add a guest to your event via our REST API you must make a POST request from your system to our endpoint at https://api.event-vault.com. This requires certain headers and content as specified below or in the curl example.
REQUEST HEADERS
| x-api-key | Your supplied API key, Do not share this under any circumstances |
| x-client-id | Your client id as shown in the system |
| x-event-id | The id of the event you want add guests too |
BODY FIELDS
| userEmail | The guests email, This is always required |
| name | The guests name to preload digital card data |
| role | The guests role to preload digital card data |
| company | The guests company to preload digital card data |
| phone | The guests phone number to preload digital card data |
| url | The guests url to preload digital card data |
| country | The guests country to provide filtering options on guest list |
POST /addGuest
Example request with curl
curl "https://api.event-vault.com/addGuest" \
-X POST \
-H "Content-Type: application/json" \
-H "x-api-key: <your-api-key>" \
-H "x-client-id: <your-client-id>" \
-H "x-event-id: <your-event-id>" \
-d '<your body content>'
Example body format
{
 "userEmail": "guest@example.com", // Required
 "name": "John Doe",
 "role": "Attendee",
 "company": "Example Corp",
 "phone": "+1234567890",
 "url": "https://example.com",
 "country": "USA"
}
Remove GUEST
To remove a guest from your event via our REST API you must make a POST request from your system to our endpoint at https://api.event-vault.com. This requires certain headers and content as specified below or in the curl example.
REQUEST HEADERS
| x-api-key | Your supplied API key, Do not share this under any circumstances |
| x-client-id | Your client id as shown in the system |
| x-event-id | The id of the event you want add guests too |
BODY FIELDS
| userEmail | The guests email, This is always required |
POST /removeGuest
Example request with curl
curl "https://api.event-vault.com/addGuest" \
-X POST \
-H "Content-Type: application/json" \
-H "x-api-key: <your-api-key>" \
-H "x-client-id: <your-client-id>" \
-H "x-event-id: <your-event-id>" \
-d '<your body content>'
Example body format
{
 "userEmail": "guest@example.com", // Required
}
ADD TICKET
To add a ticket to your event via our REST API you must make a POST request from your system to our endpoint at https://api.event-vault.com. This requires certain headers and content as specified below or in the curl example.
REQUEST HEADERS
| x-api-key | Your supplied API key, Do not share this under any circumstances |
| x-client-id | Your client id as shown in the system |
| x-event-id | The id of the event you want add guests too |
BODY FIELDS
| userEmail | The guests email, This is always required |
| ticketType | The type of ticket |
| sessionId | The id of the session if you want to link it to one |
POST /addTicket
Example request with curl
curl "https://api.event-vault.com/addGuest" \
-X POST \
-H "Content-Type: application/json" \
-H "x-api-key: <your-api-key>" \
-H "x-client-id: <your-client-id>" \
-H "x-event-id: <your-event-id>" \
-d '<your body content>'
Example body format
{
 "userEmail": "guest@example.com", // Required
 "ticketType": "ENTRY",
 "sessionId": "",
}
REMOVE TICKET
To remove a ticket from your event via our REST API you must make a POST request from your system to our endpoint at https://api.event-vault.com. This requires certain headers and content as specified below or in the curl example.
REQUEST HEADERS
| x-api-key | Your supplied API key, Do not share this under any circumstances |
| x-client-id | Your client id as shown in the system |
| x-event-id | The id of the event you want add guests too |
BODY FIELDS
| userEmail | The guests email, This is always required |
| ticketType | The type of ticket |
POST /removeTicket
Example request with curl
curl "https://api.event-vault.com/addGuest" \
-X POST \
-H "Content-Type: application/json" \
-H "x-api-key: <your-api-key>" \
-H "x-client-id: <your-client-id>" \
-H "x-event-id: <your-event-id>" \
-d '<your body content>'
Example body format
{
 "userEmail": "guest@example.com", // Required
 "ticketType": "ENTRY",
}